Audio Normalization Values for Video Recording in PTBooth A1 PLUS
When PTBooth A1 PLUS is in video recording mode, there is a wide range of settings available to ensure the highest quality of video recording.
The video consists of both Video and Audio. With PTBooth A1 PLUS you will have the ability to control and adjust the critical settings for both of the video and audio components.
The Video settings include: Camera source, Video resolution, Video compressors, Video format and Video camera controls (brightness, contrast, zoom etc.)
The Audio settings include: Microphone source, Microphone recording levels, Audio compressors, Audio meters and Audio Normalization
In this tutorial we will show you how to set up the Audio Normalization values for Peak normalization and Gain if your Audio is distorted
Audio Normalization allows you to control your incoming audio signal to prevent audio distortion.
PLEASE NOTE: If you want your video to have a clear sound it CRITICAL to Perform Video Recording Test. Watch your test video and listen closely for any audio distortion.
If there is no audio distortion you will not need to adjust any Audio Normalization settings. Simply use the default Audio Normalization values.
Quick overview:
- SET VIDEO RECORDING SETTINGS - Read how
- SET AUDIO RECORDING SETTINGS - Read how
- PERFORM VIDEO RECORDING TEST
- Check yout test video and see if Audio is not distorted
- If Audio Distortion is present use the Audio Graph tool to analyze the issue
- Adjusting Peak normalization
- Adjusting Gain
READ: How To Set Basic Settings To Record Video in PTBooth A1 PLUS
Once you have set your basic settings for video recording you should perform a video recording test (30-40 seconds).
Perform a Video recording test with the default Audio Normalization settings
A video recording test is very helpful in order to determine if the parameters are set to deliver the maximum possible quality of the recorded video.
Usually 30-40 seconds is enough for the test video.
During the Video recording test make sure to re-create all plausible scenarios that will reflect the actual scene at the event.
The following are the main factors to account for:
1. background noise (music played by DJ, groups of people talking loudly)
2. people screaming in close proximity to the microphone (often happens during the photosession)
3. lighting inside your photo booth (if the recorded test video ends up dark you may need to boost your lighting or adjust the camera brightness and contrast)
4. distance from the camera to the people using the photo booth (you can adjust initial zoom level of your camera)
PLEASE NOTE: It depends on your particular case but you may need to conduct several Video recording tests to verify how the adjustments made will affect your video recordings. We encourage you to conduct as many Video recording tests as needed to make sure your settings are set to deliver the highest quality video recording.
Perform Video Recording Test (IMPORTANT)
Start Video Recording Test
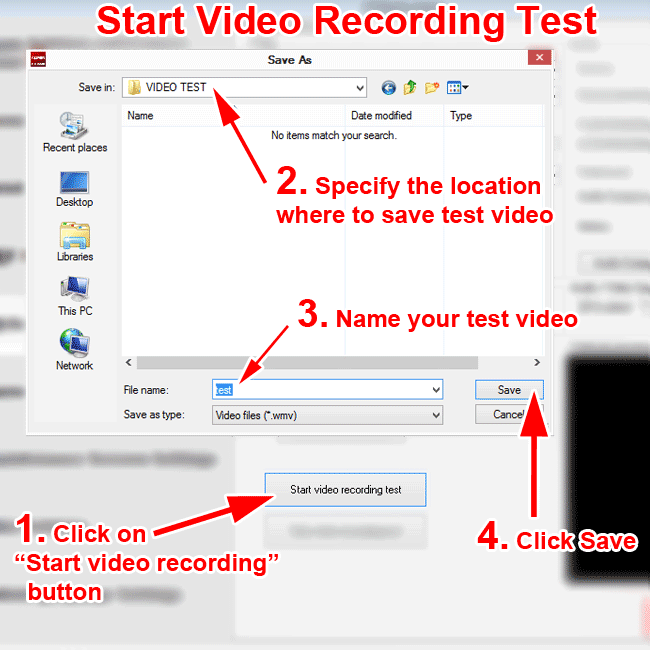
1. Click on "Start video recording" button,
2. Specify the location on your computer where you want to save the test video,
3. Name your test video,
4. Click save, Video recording will begin.
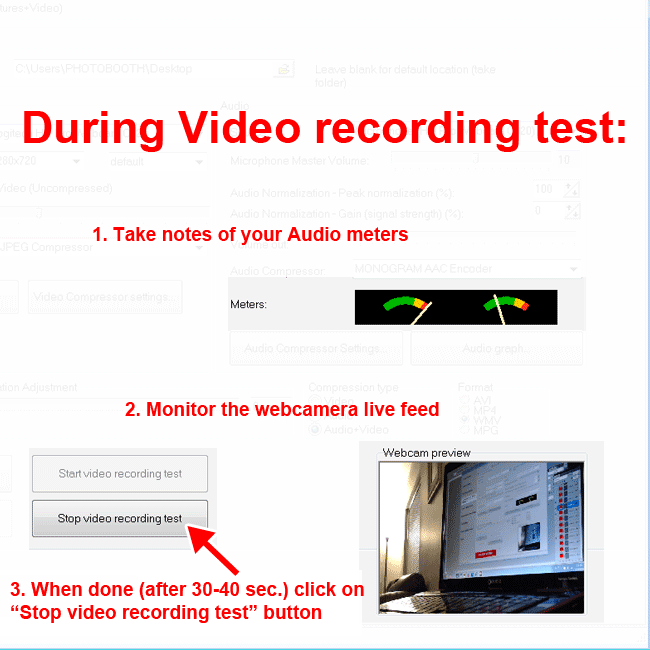
Monitor your audio levels and webcam preview during the Video recording test
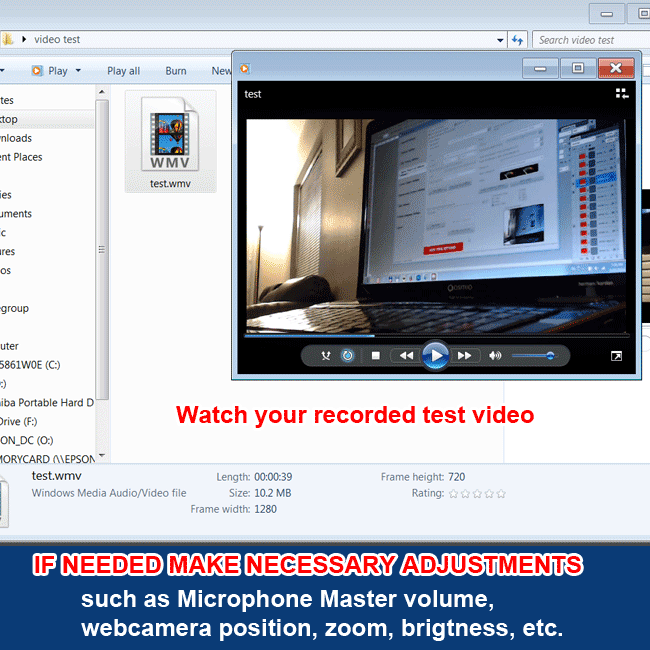
Examine your recorded test Video by Watchng and Listening closely
Examine your recorded test Video by Watchng and Listening closely and if necessary make any adjustments that you wish (webcamera position, zoom, microphone master level, etc.)
If any Audio Distortion is present in your test video you can use the Audio Graph tool to analyze the issue
If you detect any audio distortion you will need to adjust the Audio Normalization values to eliminate the distortion.
To analyze the audio distortion use the Audio Graph tool. When you click on the Audio Graph the "Audio Volume Chart" window will open.
You will see the following data: Microphone Master Volume Level, Incoming Audio Volume level, Peak normalization level and Gain level.
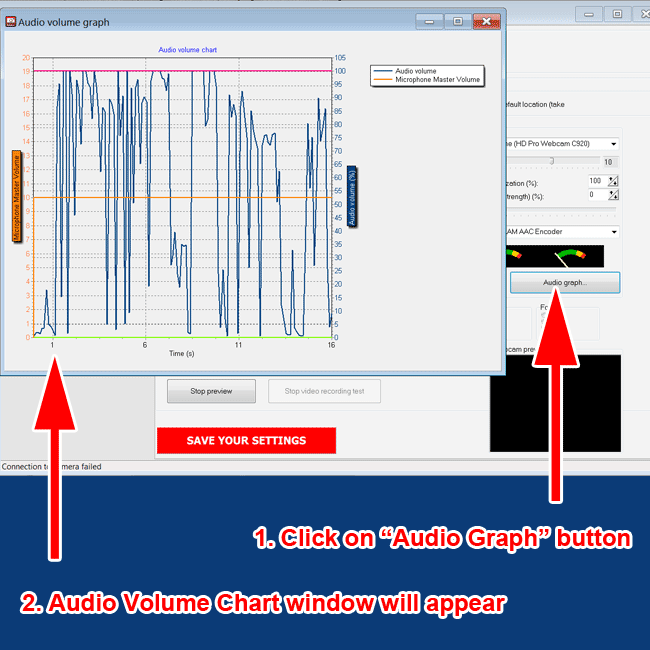
Audio Volume Graph Explained
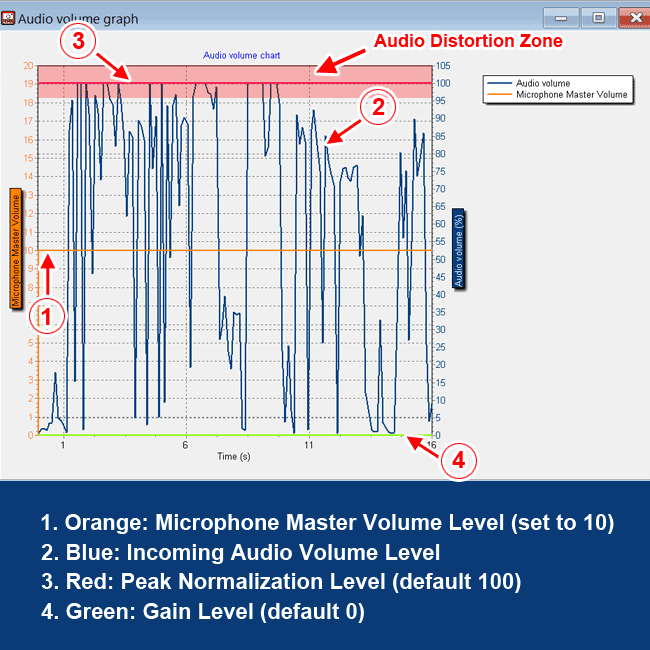
In the "Audio Volume Graph" window you will be able to see the following color coded data:
1. Orange line: Microphone Master Volume Level,
2. Blue line: Incoming Audio Volume level,
3. Red line: Peak normalization level
4. Green line: Gain level.
In this particular example we are using the Peak normalization (100%) and Gain (0%) default values.
Audio distortion occurs when the Audio Volume level goes over 95%-98%. We have highlighted in red the Audio Distortion Zone (Audio Volume level 96%-105%) in red.
Looking at the chart below you can see the audio distortion is happening because:
the Blue line (2) shows the incoming Audio Volume level spiking way above our Orange line (1) which is the Microphone Master Volume Level and reaches the Audio Distortion Zone (Audio Volume level 96%-105%)
Adjusting Peak normalization
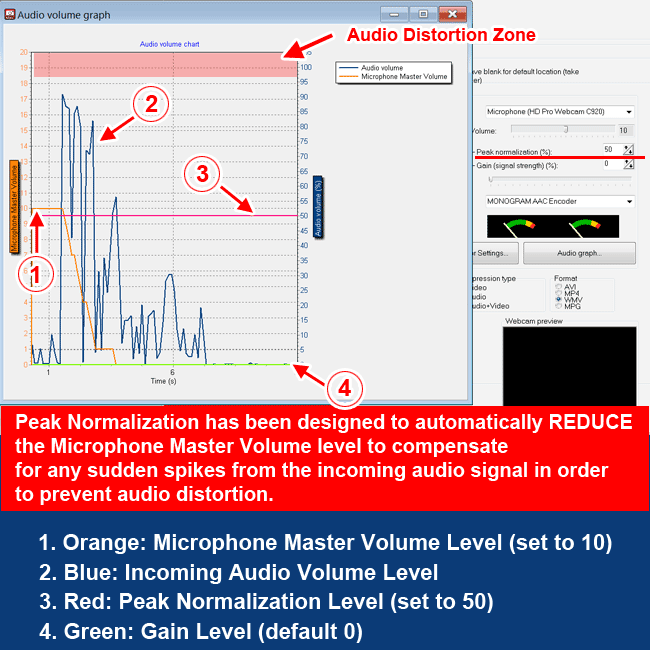
Peak Normalization has been designed to automatically REDUCE the Microphone Master Volume level to compensate for any sudden spikes from the incoming audio signal in order to prevent audio distortion.
NOTE: If you make any changes to the settings don't forget to click the "SAVE YOUR SETTINGS" button in order for the changes to apply.
To prevent the audio distortion shown in the picture above we set the Peak normalization at 50% and the Gain at 0%. We conducted another Video recording test and looked at the Audio Graph chart again.
This time the audio distortion is NOT happening because when the Incoming Audio Volume Level (Blue line 2) spikes above the Microphone Master Volume Level (Orange line 1) the Peak normalization (set at 50%) automatically reduces the Microphone Master Volume Level (Orange line 1).
In other words when incoming audio signal overwhelms the normal level it will be reduced to prevent distortion.
Because our new value of the Peak normalization the Audio distortion is not occurring anymore however we now have a problem with our Microphone Master Volume Level(Orange line 1) because it continues to stay at the minimum level it was reduced to.
Adjusting Gain
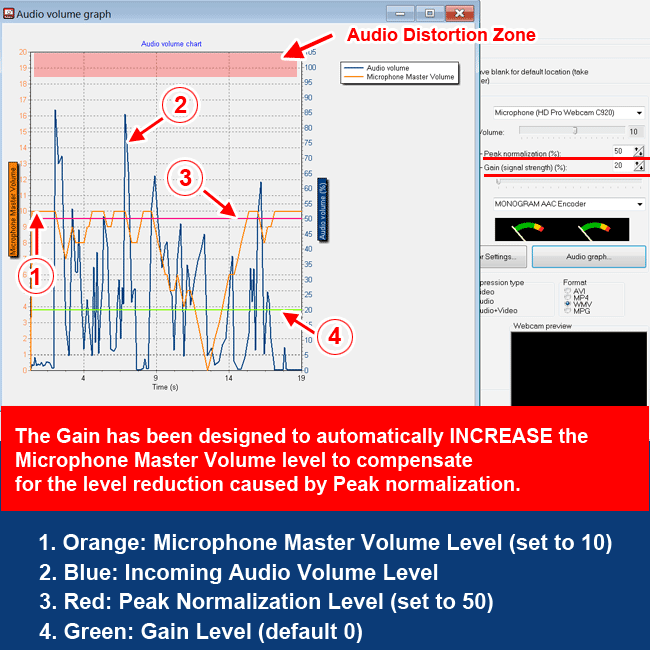
The Gain has been designed to automatically INCREASE the Microphone Master Volume level to compensate for the level reduction caused by Peak normalization.
NOTE: If you make any changes to the settings don't forget to click the "SAVE YOUR SETTINGS" button in order for the changes to apply.
In the example above we have prevented Audio Distortion by using Peak normalization (set at 50%).
Now in order to stabilize our Microphone Master Volume Level(Orange line) back to its original state we need to utilize the Gain.
In this particular example we have set the Peak normalization at 50% and the Gain at 20%.
After conducting another Video recording test we took a look at the Audio Graph chart again. As you can see, after adjusting our Gain value (set at 20%) our chart is balanced.
The audio distortion is NOT happening anymore because the Peak normalization (set at 50%) reduces the Microphone Master Volume Level (Orange line 1) and Gain (set at 20%) increasing our Microphone Master Volume Level (Orange line 1) back to its original state.
Our incoming audio volume stays in the safe zone and never reaches the Audio Distortion zone throughout the session.
Adjusting Peak normalization and Gain values at the event
There are a lot of changes occurring during the duration of the event.
The Microphone Master Volume, Peak normalization and Gain values that you have determined during your tests may not be accurate once the actual event starts.
For example, maybe at the beginning of the event there was no loud music playing or there were no large groups of people gathering around your photo booth talking loudly. The point is that the background noise level will vary during the event.
It is specifically for that reason that PTBooth A1 allows you to adjust the Microphone Master Volume, Peak normalization and Gain values on the fly using an easy shortcut.
See how it is done below.
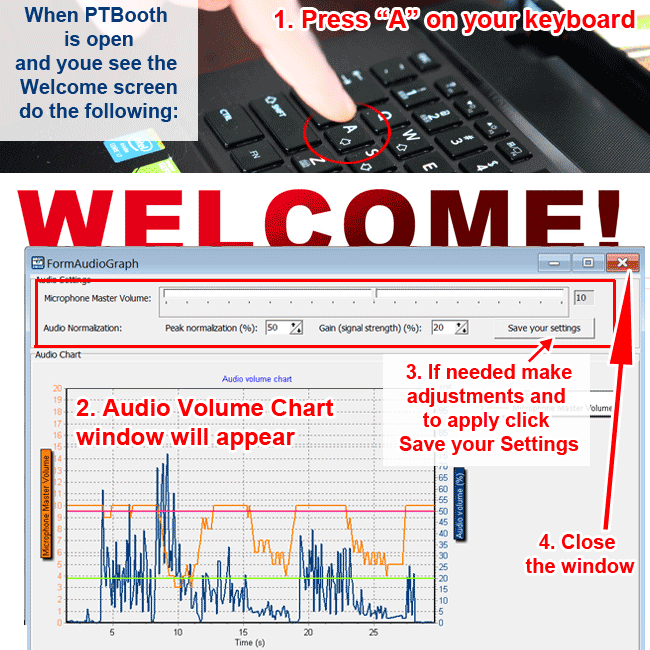
When PTBooth is open and you see the "Welcome" screen all you have to do is the following:
1. Press the "a" button on your keyboard.
2. The "Audio Volume Chart" window will appear and will display the data chart from the last recorded session.
3. IF NEEDED adjust the Microphone Master Volume, Peak normalization and Gain values and click "SAVE YOUR SETTINGS" button to apply changes.
4. Close the window and return to PTBooth.
A video recording test is very helpful in order to determine if the parameters are set to deliver the maximum possible quality of the recorded video. Usually 30-40 seconds is enough for the test video.
During the Video recording test make sure to re-create all plausible scenarios that will reflect the actual scene at the event.
The following are the main factors to account for:
1. background noise (music played by DJ, groups of people talking loudly)
2. people screaming in close proximity to the microphone (often happens during the photosession)
3. lighting inside your photo booth (if the recorded test video ends up dark you may need to boost your lighting or adjust the camera brightness and contrast)
4. distance from the camera to the people using the photo booth (you can adjust initial zoom level of your camera)
PLEASE NOTE: It depends on your particular case but you may need to conduct several Video recording tests to verify how the adjustments made will affect your video recordings. We encourage you to conduct as many Video recording tests as needed to make sure your settings are set to deliver the highest quality video recording.
2. Specify the location on your computer where you want to save the test video,
3. Name your test video,
4. Click save, Video recording will begin.


To analyze the audio distortion use the Audio Graph tool. When you click on the Audio Graph the "Audio Volume Chart" window will open.
You will see the following data: Microphone Master Volume Level, Incoming Audio Volume level, Peak normalization level and Gain level.

1. Orange line: Microphone Master Volume Level,
2. Blue line: Incoming Audio Volume level,
3. Red line: Peak normalization level
4. Green line: Gain level.
In this particular example we are using the Peak normalization (100%) and Gain (0%) default values.
Audio distortion occurs when the Audio Volume level goes over 95%-98%. We have highlighted in red the Audio Distortion Zone (Audio Volume level 96%-105%) in red.
Looking at the chart below you can see the audio distortion is happening because:
the Blue line (2) shows the incoming Audio Volume level spiking way above our Orange line (1) which is the Microphone Master Volume Level and reaches the Audio Distortion Zone (Audio Volume level 96%-105%)

NOTE: If you make any changes to the settings don't forget to click the "SAVE YOUR SETTINGS" button in order for the changes to apply.
To prevent the audio distortion shown in the picture above we set the Peak normalization at 50% and the Gain at 0%. We conducted another Video recording test and looked at the Audio Graph chart again.
This time the audio distortion is NOT happening because when the Incoming Audio Volume Level (Blue line 2) spikes above the Microphone Master Volume Level (Orange line 1) the Peak normalization (set at 50%) automatically reduces the Microphone Master Volume Level (Orange line 1).
In other words when incoming audio signal overwhelms the normal level it will be reduced to prevent distortion.
Because our new value of the Peak normalization the Audio distortion is not occurring anymore however we now have a problem with our Microphone Master Volume Level(Orange line 1) because it continues to stay at the minimum level it was reduced to.

NOTE: If you make any changes to the settings don't forget to click the "SAVE YOUR SETTINGS" button in order for the changes to apply.
In the example above we have prevented Audio Distortion by using Peak normalization (set at 50%).
Now in order to stabilize our Microphone Master Volume Level(Orange line) back to its original state we need to utilize the Gain.
In this particular example we have set the Peak normalization at 50% and the Gain at 20%.
After conducting another Video recording test we took a look at the Audio Graph chart again. As you can see, after adjusting our Gain value (set at 20%) our chart is balanced.
The audio distortion is NOT happening anymore because the Peak normalization (set at 50%) reduces the Microphone Master Volume Level (Orange line 1) and Gain (set at 20%) increasing our Microphone Master Volume Level (Orange line 1) back to its original state.
Our incoming audio volume stays in the safe zone and never reaches the Audio Distortion zone throughout the session.

The Microphone Master Volume, Peak normalization and Gain values that you have determined during your tests may not be accurate once the actual event starts.
For example, maybe at the beginning of the event there was no loud music playing or there were no large groups of people gathering around your photo booth talking loudly. The point is that the background noise level will vary during the event.
It is specifically for that reason that PTBooth A1 allows you to adjust the Microphone Master Volume, Peak normalization and Gain values on the fly using an easy shortcut.
See how it is done below.
When PTBooth is open and you see the "Welcome" screen all you have to do is the following:
1. Press the "a" button on your keyboard.
2. The "Audio Volume Chart" window will appear and will display the data chart from the last recorded session.
3. IF NEEDED adjust the Microphone Master Volume, Peak normalization and Gain values and click "SAVE YOUR SETTINGS" button to apply changes.
4. Close the window and return to PTBooth.

