About Print Template Creator in PTBooth A1 PLUS
PTBooth Print Template Creator allows you to create custom print template layouts for any media size (4x6, 5x7, 8x10 etc.) and as many print templates as you want.
PTBooth Print Template Creator will come in handy if you want to offer a more unique photo printing layout and design for your customers.
For example you can create different themes that relate to the type of event you are providing the photo booth for by laying in different artwork images, logos, and image layout design.
READ: Custom Print Templates in PTBooth - Examples from PTBooth owners
READ How To Create A Print Template
READ How To Use Transparent/External Images in Print Template
PTBooth Print Template Creator Features
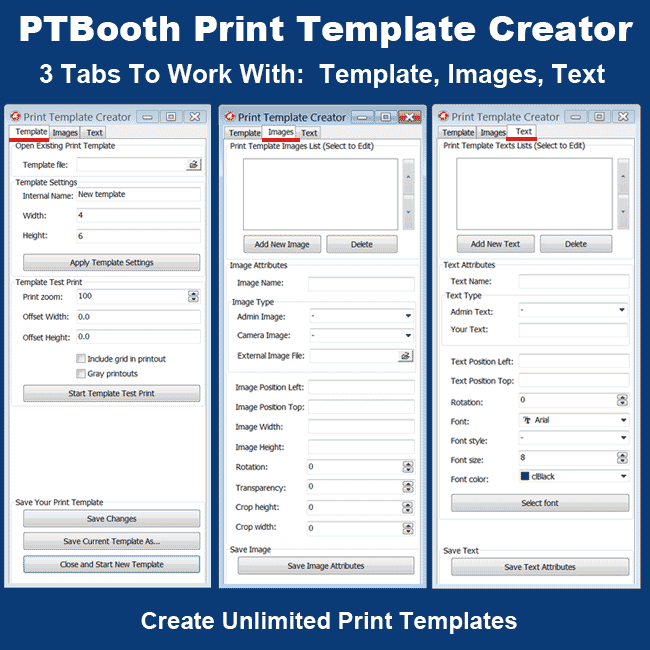
Template Tab
Print Template Settings Explained
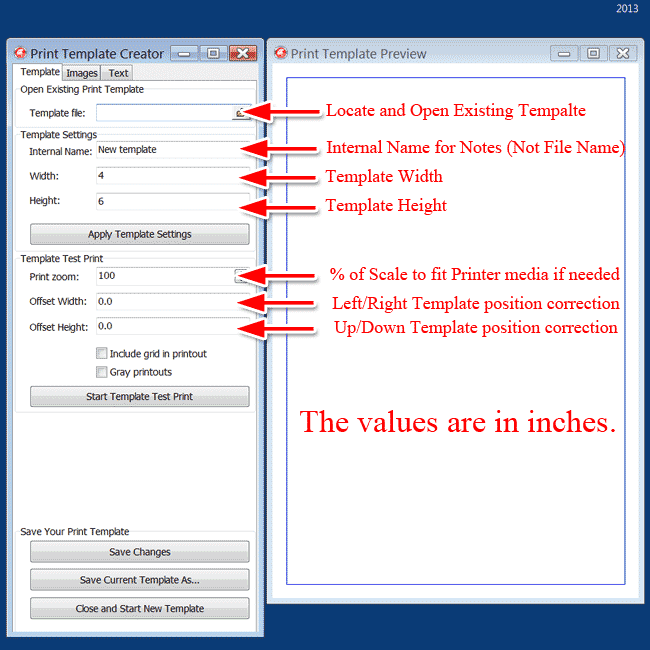
Values are in INCHES.
In order to see changes set your width and height values and click on the "Apply Template Settings" button.
PTBooth Print Template Creator will come in handy if you want to offer a more unique photo printing layout and design for your customers.
For example you can create different themes that relate to the type of event you are providing the photo booth for by laying in different artwork images, logos, and image layout design.
READ: Custom Print Templates in PTBooth - Examples from PTBooth owners
READ How To Create A Print Template
READ How To Use Transparent/External Images in Print Template

PTBooth Print Template Creator Features
Template Tab
Print Template Settings Explained

Values are in INCHES.
In order to see changes set your width and height values and click on the "Apply Template Settings" button.
In Template Tab you will be able to set the size of your template, print a test of your template,
save any changes and open any existing print template.
1. Print Template file - If you decide to edit an existing template you can search and locate the file you would like to edit. Once you have selected the file it will automatically open and you can then begin to edit it and make any changes that you want. If you are starting a new template from scratch you can just go ahead and ignore this field.
2. Internal Name - internal name is used to put down notes about the template you are creating. For example "Template for bridal expo"
Internal Name is NOT PRINT TEMPLATE FILE NAME
3. Width - width of your template in inches for printer media you are using. Such as 4x6, 5x7, 4x8 etc.
4. Height: - height of your template in inches for printer media you are using. Such as 4x6, 5x7, 4x8 etc.
5. Apply Template Settings - can be clicked on at anytime to save your template attributes so you can see the results of your changes in the print template preview window.
6. Print Zoom - % of template scale to fit prinetr media. Used very rarely. Most of the printers does not require to scale your template.
7. Offset Width - template LEFT/RIGHT position adjustments to match your printer alignment. For example 0.1 in Offset Width value will move your template to the Right -0.1 will move your template to the Left at the 0.1 inches in distance.
8. Offset Height - template DOWN/UP position adjustments to match your printer alignment. For example 0.1 in Offset Width value will move your template to the Bottom -0.1 will move your template UP at the 0.1 inches in distance.
Print Zoom, Offset Width and Offset Height values are unique for Each Particular Printer.
Once you determine Print Zoom, Offset Width and Offset Height you will need to enter those values into your PTBooth Admin Printing tab.
Now any template you create will always be ready to print using those values with that particular printer.
If you ever use another printer you need to determine new values for Print Zoom, Offset Width and Offset Height even if your new printer is of the same brand and model number as previous.
9. Save Changes - saves all changes made with the current open template.
10. Save Current Template As... - allows you to save current open template with different template name. "Save As"
11. Close and Start New Template - closes current open template without saving changes and opens new blank template for editing.
Images Tab
Print Template Image Settings Explained
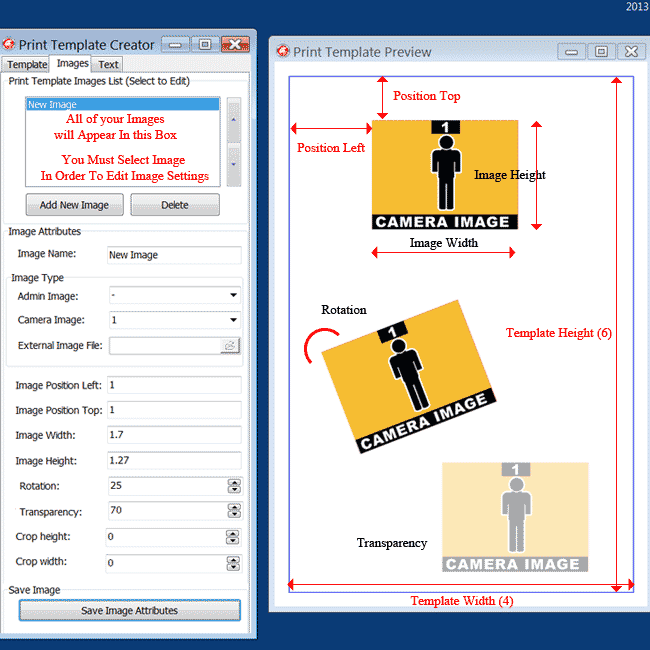
The default values when you start in the Image attributes section are all 0.
So the only way to see your image in the preview window is to set your width and height values and click on the "Save Image Attributes" button.
In Images Tab you will be able to manipulate all of you images including any and all logos and photos taken during the photo session.
1. Print Template Images List - All of the images you insert will appear as a list in the Print Template Images list box. Much like photo shop the print template is designed using a series of layers that will be determined by the order that your images appear in the box. You can arrange these layers by using the arrows to the right of the box. For instance if you are creating a background you would want to have that as your first image (layer 1) and build each image layer on top of that.
2. "Add new image" - To add a new image to the print template click on the "Add new image" button and you will see an image title will appear in the images list box with a default title of "New Image". To adjust the settings of this image you have to select this image by clicking on the image name (when image is selected it highlighted in blue) and then you can adjust and customize the image attributes.
3. Image Name - you want to name your image in order to avoid confusion later on.
4. Image Type:
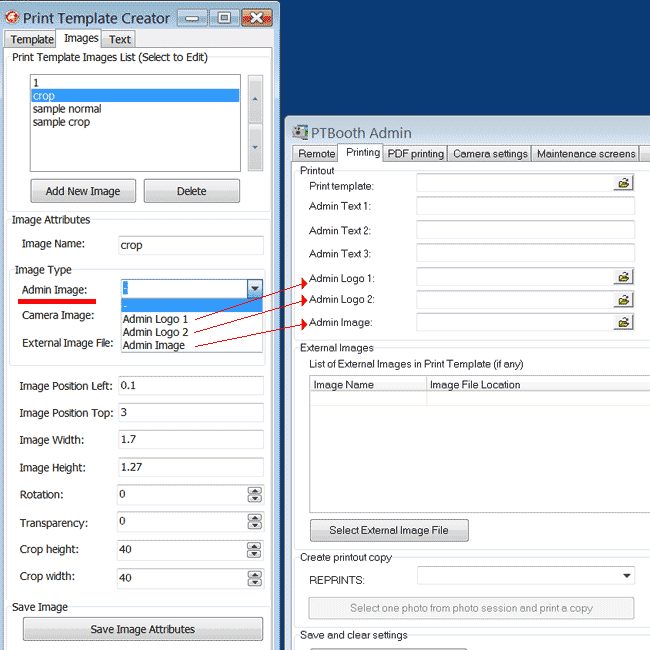
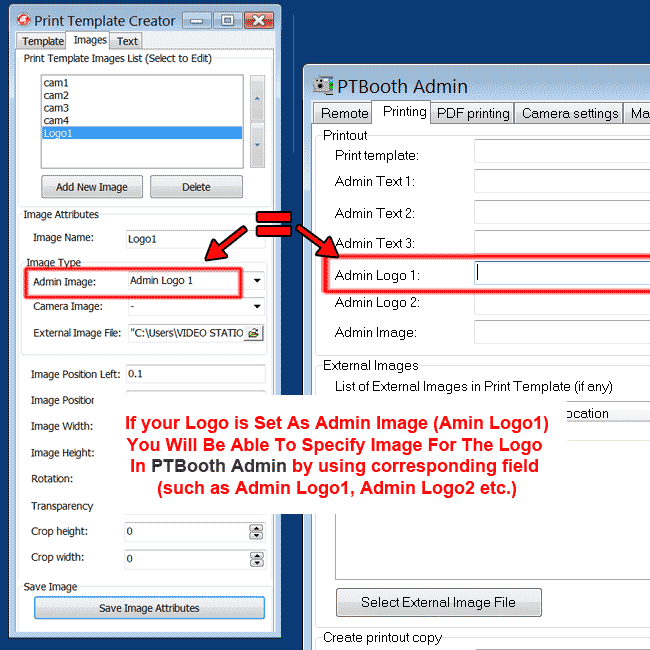
Admin Image - corresponds with the pt booth admin fields. which is Admin logo 1, Admin logo 2 and Admin Image. It means that once you assigned the image as an admin image the actual file for this image will be set in the PTBooth Admin
Camera Image - these are the images that your camera will take during a photo session. You can assign up to 4 images that the PTBooth software will take during the photo session
External Image - These are any images from your computer other than Admin and Camera Images.
Along with Admin and Camera Images you can have any other image embedded in your print template.
For example an additional logo on top of the camera pictures, an artwork image covering the borders of your template etc.
All external images will show up in your PTBooth Admin and you will have to specify the file that corresponds with each particular external image in your print template.
Also you can use External image files to temporarily substitute your admin picture with any external image so you can see how it will appear in your template.
Any external image assigned to Admin images will not show up during the usage of your print template and will only be visible in your Template Creator and is only for testing purposes.
5. Image Position Left - will determine how close to the left edge of the media your image will appear. All the values are in inches so you may have to play with it to determine the position of your image.
6. Image Position Top - will determine how close to the top edge of the media your image will appear. All the values are in inches so you may have to play with it to determine the position of your image.
7.Image Width - self explanatory.
8.Image Height - self explanatory.
9. Rotation - allows you to rotate your image at any given degree.
10. Transparency - allows you to fade the image
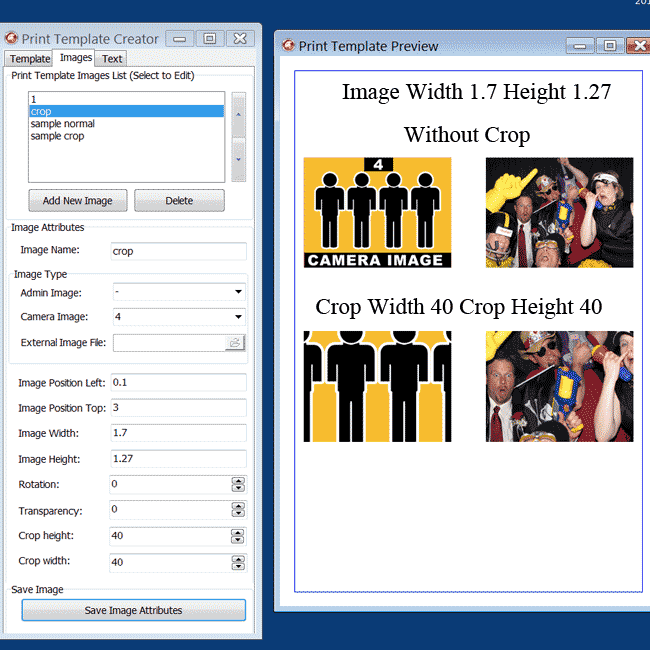
11. Crop Height - works almost like a zoom. It brings the picture closer and crops the leftover edges that do not fit into your specific size.
12. Crop Width - works almost like a zoom. It brings the picture closer and crops the leftover edges that do not fit into your specific size.
13. "Save Image Attributes" - the bottom button titled "Save Image Attributes" can be clicked on at anytime to save your image attributes or so you can see the results of your changes in the print template preview window.
Text Tab
Print Template Text Settings Explained
The default values when you start in the Text Attributes section are all 0.
So the only way to see your Text in the preview screen is to set your Font size values and click on the "Save Text Attributes" button.
In the Text tab you will be able to manipulate all of your text including take #, choice of 3 admin text, date and any other text that you may want in your print template.
1. Print template Texts list. This is where you will see the list of all your text elements that will be appearing on the template. All of the text you insert will appear as a list in the Print Template Texts list box.
2. "Add new text" To add new Text element to the print template click on "Add new text" button and you will see a text title will appear in the texts list box with a default title of "New Text". To adjust the settings of this text element you have to select it by clicking on the text name and then you can adjust and customize the text attributes.
3. Text name - you want to name your text in order to avoid confusion later on.
4. Text Type - there are two different types of text that you can incorporate into your print template.
Admin Text - corresponds with the PTBooth Admin fields. The actual source of this field will be anything that you will enter in the PTBooth Admin. You have up to 3 fields of Admin text and 2 Admin Parameters to work with.
Admin Text: Take parameter will produce # that will correspond with the Take number of the particular photosession.
Admin Text: Report Date parameter will produce a Date stamp that corresponds with the Date set in the PTBooth Admin.
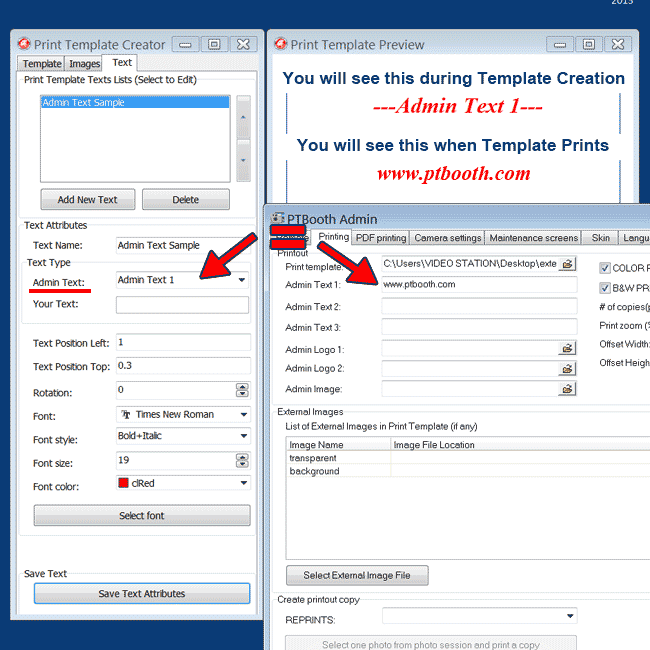
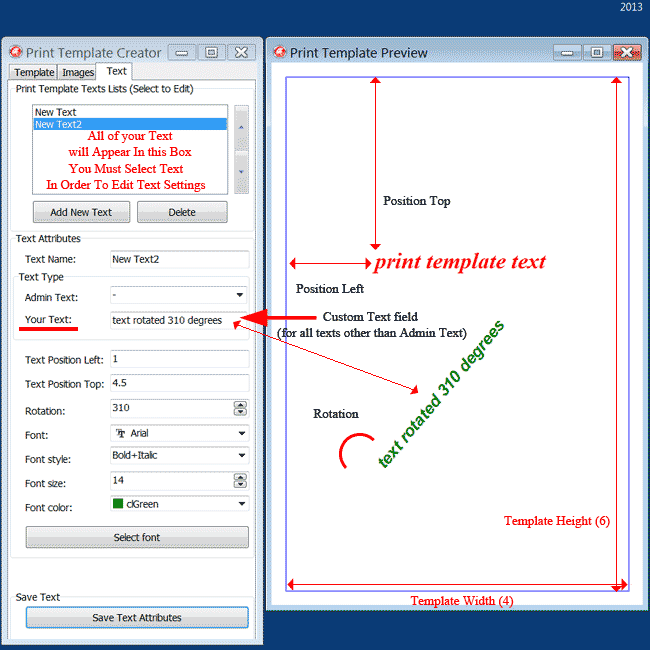
Your Text - these are the text elements that you can specify by yourself. You will need to enter the content of "Your Text" element in the template creator.
Once you have entered "Your Text" it will be present in your template at all times and you will have to use the Print Template creator to edit this text. Admin text will have no affect on "Your Text" element.
5. Text Position Left - will determine how close to the left edge of the media your Text will appear. All the values are in inches so you may have to play with it to determine the position of your image.
6. Text Position Top - will determine how close to the top edge of the media your Text will appear. All the values are in inches so you may have to play with it to determine the position of your image.
7. Rotation - allows you to rotate your text at any give degree.
8. Font - will allow you to select a font family from the dropdown list.
9.Font style - will allow to apply style to your Text such as Regular, Bold, Italic etc.
10. Font size - self explanatory
11. Font color - self explanatory
12. Select Font button is an alternative way to choose your font, font style and font size that provides a visual for any font selection
13. "Save Text Attributes" - the bottom button titled "Save Text Attributes" can be clicked on at anytime to save your text attributes or so you can see the results of your changes in the print template preview window
