Call Us: (402) 812.5676 Email: info@ptbooth.com
How To Setup PTBooth A1 PLUS / PRO ADMIN
- 1. Main Settings and Camera Source Tab (required)
- 2. General Settings Tab (required)
- 3. Printing Settings Tab (required)
- 4. PDF Printing Settings Tab (optional)
- 5. Webcam Settings Tab (required if webcamera is used)
- 6. Canon Camera Settings Tab (required if Canon camera is used)
- 7. Maintenance Screens Settings Tab (optional)
- 8. Skin Settings Tab (required)
The Admin Setup is IDENTICAL for BOTH PTBooth A1 PLUS and PTBooth A1 PRO versions
The ONLY difference is Print Templates choice.
ADMIN SETUP SUMMARY:
You must set the settings in the following tabs
Main Settings and Camera Source Tab

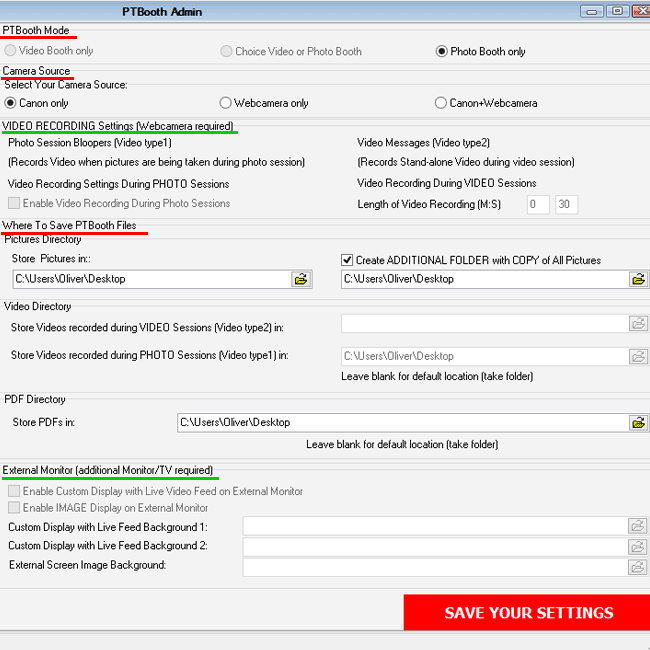
Example of settings in Main Settings and Camera Source Tab (required)
REQUIRED SETTINGS:
PTBooth Mode - choose from Video Booth only, Choice Video or Photo Booth, Photo Booth only
Camera Source - choose from Canon only, Webcamera only, Canon + Webcamera
Where to save PTBooth Files - specify the location on your computer where you want to save files created with PTBooth (photos,videos,PDFs)
OPTIONAL SETTINGS:
Video Recording Settings - if Video recording is enabled specify video recording settings for Video type 1 and/or Video type 2
External Monitor - if you want to use an external monitor choose Option 1 or Option 2
Once you set your settings click on "SAVE YOUR SETTINGS" button
Main Settings and Camera Source Tab RELATED ARTICLES
- What Are The PTBooth Modes and How To Use Them
- How To Setup Choice Video or Photo Booth Mode
- How To Setup Photo Booth Only Mode
- How To Setup Video Booth Only Mode
- What Are The External Monitor Display Options and How To Use Them
- How To Setup and Use Option 1:
Custom Display with Live Video Feed on External Monitor
- How To Setup and Use Option 2:
Image Display on External Monitor
General Settings Tab

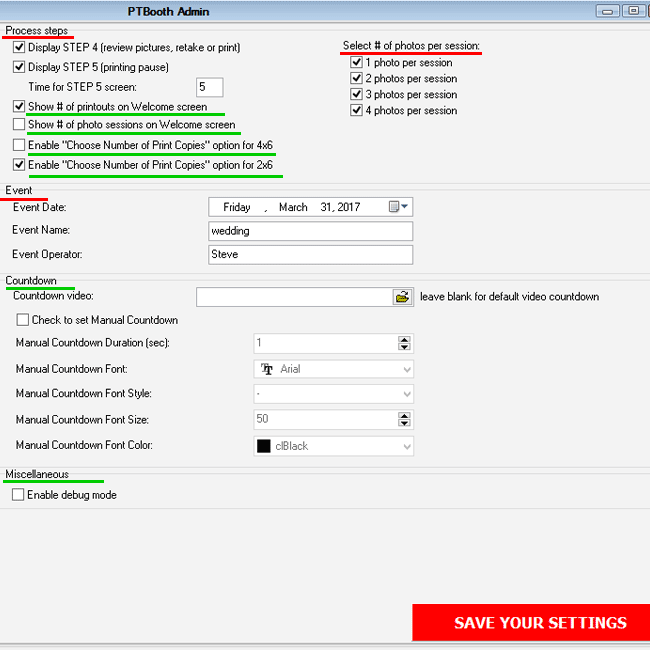
Example of settings in General Settings Tab (required)
REQUIRED SETTINGS:
Process Steps - enable/disable Step 4 and/or Step 5
Select # of Photos per session - choose how many photos will be taken each session
Event information - specify the Event Date, Event Name, Event Operator
OPTIONAL SETTINGS:
Show # of printouts on the Welcome screen - if enabled you will be able to see total # of prints at a particular moment in the right bottom corner of the Welcome screen.
Show # of photo sessions on the Welcome screen - if enabled you will be able to see total # of photosessions at a particular moment in the right bottom corner of the Welcome screen.
Enable "Choose Number of Print Copies" option for 4x6 - enable/disable choice of how many copies to print for 4x6 layout
Enable "Choose Number of Print Copies" option for 2x6 - enable/disable choice of how many copies to print for 2x6 layout
Countdown - enable/disable manual countdown, specify location of the custom video countdown file
Miscellaneous: Debug Mode - enable/disable Debug Mode - leave blank!
Once you set your settings click on "SAVE YOUR SETTINGS" button
General Settings Tab RELATED ARTICLES
- How To Enable/Disable "Choose the number of copies to print" option in PTBooth A1 PLUS
- How To Use Last 2 Screens (Step 4 and Step 5)
- How To Set up Manual Countdown in PTBooth A1
Printing Settings Tab

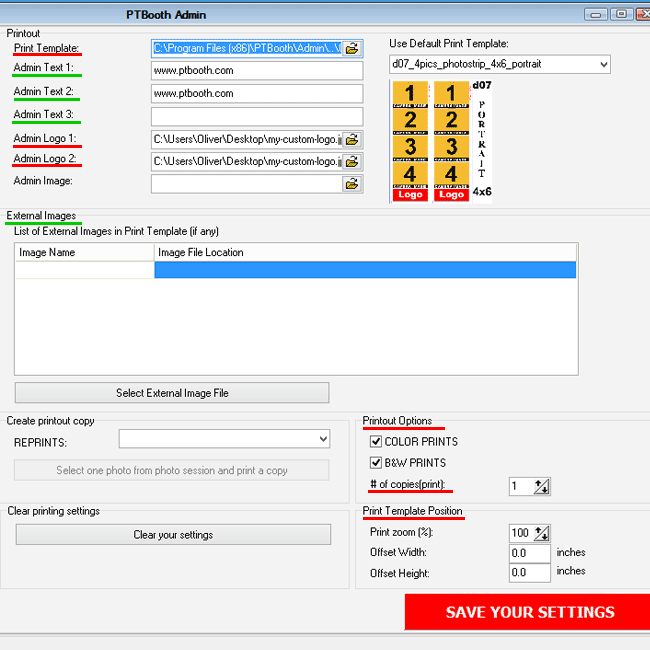
Example of settings in Printing Settings Tab (required)
REQUIRED SETTINGS:
Print Template - specify which print template you want to use (choose one of the Default Print Template or Custom built Print Template)
NOTE!!! IF YOU ARE USING PTBooth A1 PRO Version and PTBooth Transfer App
Print Template - you must select Print Template with Transfer ID!
Template preview image will contain "Includes Transfer ID" text

Admin Logo - specify the location on your computer where the logo JPEG file is stored. Admin Logo 1 is required. Admin Logo 2 and Admin image is optional depending on your Print Template layout
Printout Options - choose - Printing Color only, - Printing B&W only, - Printing B&W or Color (guest choice)
# of copies printed - specify the # of copies that will be printed each session
Print Template Position - specify the Print Zoom, Offset Width and Offset Height values
OPTIONAL SETTINGS:
Admin Text - enter desired text if your print template has text element
External Images - if your print template has external image(s) element specify the location on your computer where the each external image file is stored.
Once you set your settings click on "SAVE YOUR SETTINGS" button
Printing Settings Tab RELATED ARTICLES
- How To Use Default Print Templates in PTBooth A1 PLUS
- How To Use Default Print Templates With Background Image in PTBooth A1 PLUS
- How To Achieve Perfect Alignment of Print Template in PTBooth using Print Zoom, Offset Width and Offset Height settings
- How To Setup PTBooth Admin When Transparent/External Images used in Print Template
- How To Reprint Original Photostrips in PTBooth Admin
PDF Printing Settings Tab

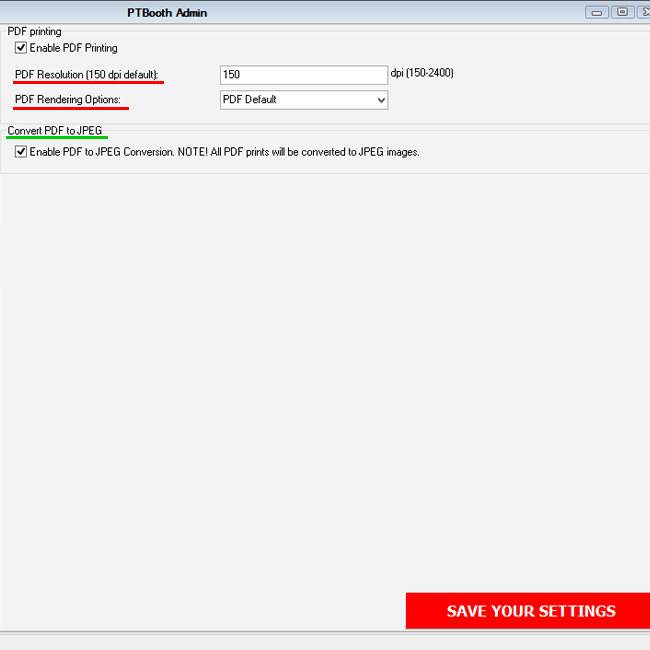
Example of settings in PDF Printing Settings Tab (optional)
REQUIRED SETTINGS (if enabled):
PDF Resolution - specify PDF resolution. Recommended 150 dpi. Bigger value delivers more quality but requires more resources and may slowdown your computer
PDF Rendering options - choose PDF Default or PDF with transparent images depending on your needs
OPTIONAL SETTINGS:
Convert PDF to JPEG - enable PDF to JPEG conversion if you wish to have JPEG files instead of PDF.
Once you set your settings click on "SAVE YOUR SETTINGS" button
PDF Printing Settings Tab RELATED ARTICLES
- What PTBooth A1 PLUS 2016 Version Delivers
Webcam Settings Tab

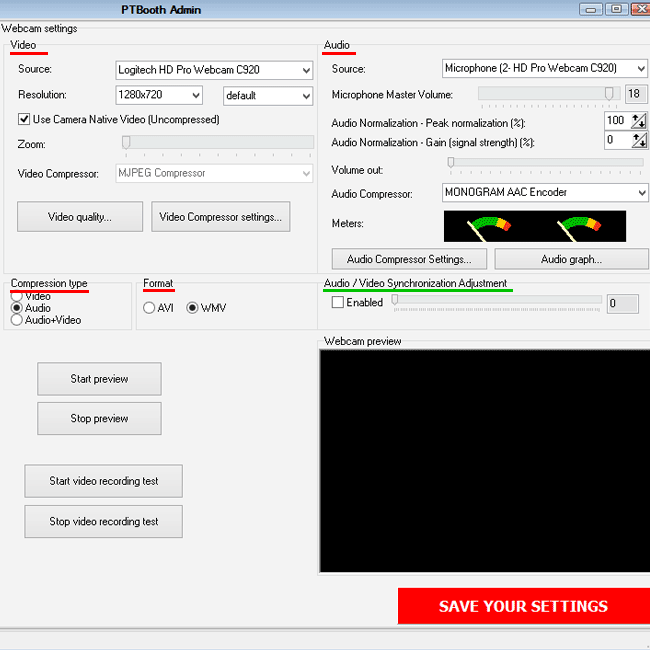
Example of settings in Webcam Settings Tab (required if Webcam is used for video recording or as your primary camera to take photos)
REQUIRED SETTINGS (if enabled):
Webcamera Video Settings - specify Webcamera Source, Video Resolution, Video Compressor, Use Webcamera Native Compression (if webcamera has internal hardware compression)
Webcamera Audio Settings - specify Webcamera Microphone Audio Source, Webcamera Microphone Master Volume, Audio Normalization Values: Peak and Gain, Audio Compressor
Compression type - choose what PTBooth will compress: Video only, Audio only, Video and Audio
Format - choose video file format WMV, AVI. Recdommended WMV file format.
OPTIONAL SETTINGS:
Audio/Video Synchronization Adjustment - if required.
Once you set your settings click on "SAVE YOUR SETTINGS" button
Webcam Settings Tab RELATED ARTICLES
- How To Use Webcam To Take Photos in PTBooth A1 PLUS
- How To Set Basic Settings To Record Video in PTBooth A1 PLUS
- How To Set Audio Normalization Values for Video Recording in PTBooth A1 PLUS
Canon Camera Settings Tab

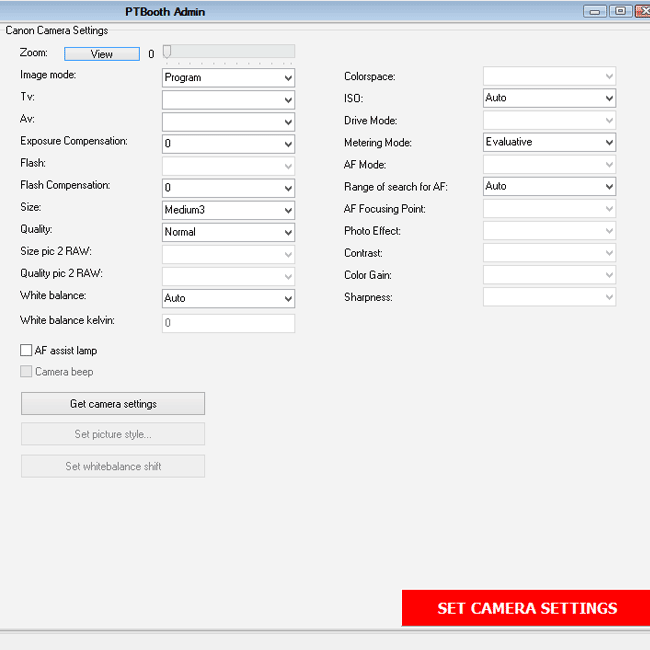
Example of settings in Canon Camera Settings Tab (required if Canon is your primary camera to take photos)
REQUIRED SETTINGS (if enabled):
Camera Settings - specify availabe desired Canon camera settings. NOTE: Available camera settings is different for a particular Canon camera model.
Once you set your settings click on "SET CAMERA SETTINGS" button
Canon Camera Settings Tab RELATED ARTICLES
- Recommended Canon Camera Settings
Maintenance Screens Settings Tab

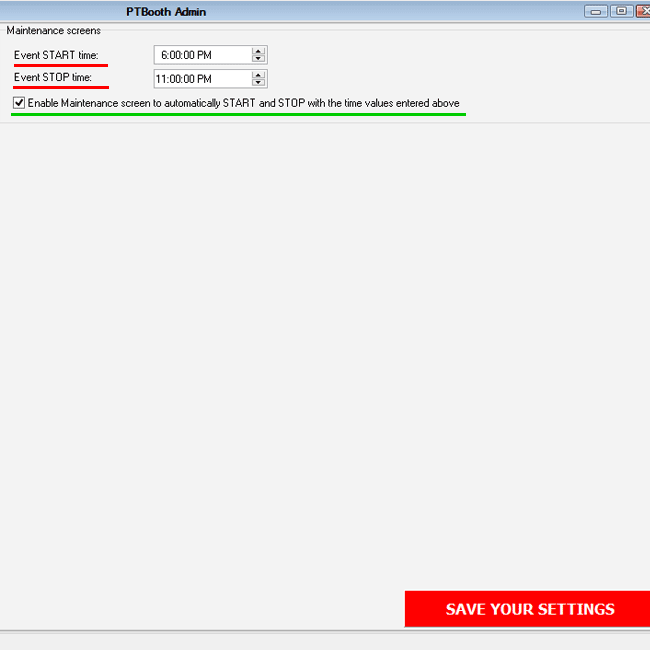
Example of settings in Maintenance Screens Settings Tab (optional)
REQUIRED SETTINGS (if enabled):
Event START Time - specify your event start time
Event START Time - specify your event end time
OPTIONAL SETTINGS:
Operation Timer - enable Maintenance Screen to automatically START and STOP with the time values specified.
Once you set your settings click on "SAVE YOUR SETTINGS" button
Maintenance Screens Settings Tab RELATED ARTICLES
- How To Use PTBooth Maintenance Screens
- How To Setup and Use Operation Timer
(Time Sensitive Maintenance Screen)
Skin Settings Tab

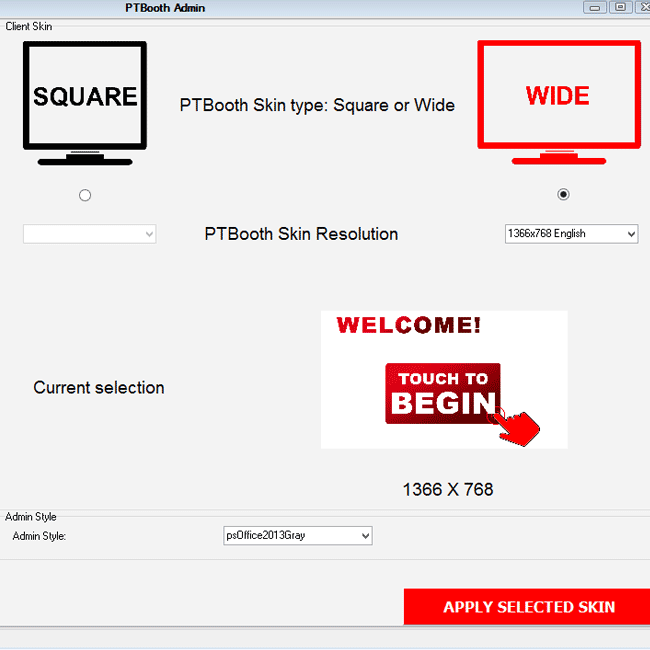
Example of settings in Skin Settings Tab (required)
REQUIRED SETTINGS:
PTBooth Skin Type - specify your skin type: Square or Wide.
PTBooth Skin Resolution - specify your Skin Resolution. Skin Resolution is a specific size of the Skin files that matches your computer screen resolution.
SUPPORTED SCREEN RESOLUTIONS:
Square: 1024x768, 1280x1024
Wide: 1280x768, 1360x768, 1366x768, 1920x1080
OPTIONAL SETTINGS:
Admin Style - choose your Admin style fro the list. Admin style defines the visual appearance of the PTBooth Admin
Once you set your settings click on "APPLY SELECTED SKIN" button
Skin Settings Tab RELATED ARTICLES
- How To Create Your Own Skin
After you have set all necessary settings in all Required and Optional Tabs your PTBooth A1 PLUS is set and ready to be used.
Back to "How To Articles"
REQUIRED SETTINGS:
PTBooth Mode - choose from Video Booth only, Choice Video or Photo Booth, Photo Booth only
Camera Source - choose from Canon only, Webcamera only, Canon + Webcamera
Where to save PTBooth Files - specify the location on your computer where you want to save files created with PTBooth (photos,videos,PDFs)
OPTIONAL SETTINGS:
Video Recording Settings - if Video recording is enabled specify video recording settings for Video type 1 and/or Video type 2
External Monitor - if you want to use an external monitor choose Option 1 or Option 2
Once you set your settings click on "SAVE YOUR SETTINGS" button

Main Settings and Camera Source Tab RELATED ARTICLES
- What Are The PTBooth Modes and How To Use Them
- How To Setup Choice Video or Photo Booth Mode
- How To Setup Photo Booth Only Mode
- How To Setup Video Booth Only Mode
- What Are The External Monitor Display Options and How To Use Them
- How To Setup and Use Option 1:
Custom Display with Live Video Feed on External Monitor
- How To Setup and Use Option 2:
Image Display on External Monitor
General Settings Tab

Example of settings in General Settings Tab (required)
REQUIRED SETTINGS:
Process Steps - enable/disable Step 4 and/or Step 5
Select # of Photos per session - choose how many photos will be taken each session
Event information - specify the Event Date, Event Name, Event Operator
OPTIONAL SETTINGS:
Show # of printouts on the Welcome screen - if enabled you will be able to see total # of prints at a particular moment in the right bottom corner of the Welcome screen.
Show # of photo sessions on the Welcome screen - if enabled you will be able to see total # of photosessions at a particular moment in the right bottom corner of the Welcome screen.
Enable "Choose Number of Print Copies" option for 4x6 - enable/disable choice of how many copies to print for 4x6 layout
Enable "Choose Number of Print Copies" option for 2x6 - enable/disable choice of how many copies to print for 2x6 layout
Countdown - enable/disable manual countdown, specify location of the custom video countdown file
Miscellaneous: Debug Mode - enable/disable Debug Mode - leave blank!
Once you set your settings click on "SAVE YOUR SETTINGS" button

General Settings Tab RELATED ARTICLES
- How To Enable/Disable "Choose the number of copies to print" option in PTBooth A1 PLUS
- How To Use Last 2 Screens (Step 4 and Step 5)
- How To Set up Manual Countdown in PTBooth A1
Printing Settings Tab

Example of settings in Printing Settings Tab (required)
REQUIRED SETTINGS:
Print Template - specify which print template you want to use (choose one of the Default Print Template or Custom built Print Template)
NOTE!!! IF YOU ARE USING PTBooth A1 PRO Version and PTBooth Transfer App
Print Template - you must select Print Template with Transfer ID!
Template preview image will contain "Includes Transfer ID" text

Admin Logo - specify the location on your computer where the logo JPEG file is stored. Admin Logo 1 is required. Admin Logo 2 and Admin image is optional depending on your Print Template layout
Printout Options - choose - Printing Color only, - Printing B&W only, - Printing B&W or Color (guest choice)
# of copies printed - specify the # of copies that will be printed each session
Print Template Position - specify the Print Zoom, Offset Width and Offset Height values
OPTIONAL SETTINGS:
Admin Text - enter desired text if your print template has text element
External Images - if your print template has external image(s) element specify the location on your computer where the each external image file is stored.
Once you set your settings click on "SAVE YOUR SETTINGS" button

Printing Settings Tab RELATED ARTICLES
- How To Use Default Print Templates in PTBooth A1 PLUS
- How To Use Default Print Templates With Background Image in PTBooth A1 PLUS
- How To Achieve Perfect Alignment of Print Template in PTBooth using Print Zoom, Offset Width and Offset Height settings
- How To Setup PTBooth Admin When Transparent/External Images used in Print Template
- How To Reprint Original Photostrips in PTBooth Admin
PDF Printing Settings Tab

Example of settings in PDF Printing Settings Tab (optional)
REQUIRED SETTINGS (if enabled):
PDF Resolution - specify PDF resolution. Recommended 150 dpi. Bigger value delivers more quality but requires more resources and may slowdown your computer
PDF Rendering options - choose PDF Default or PDF with transparent images depending on your needs
OPTIONAL SETTINGS:
Convert PDF to JPEG - enable PDF to JPEG conversion if you wish to have JPEG files instead of PDF.
Once you set your settings click on "SAVE YOUR SETTINGS" button

PDF Printing Settings Tab RELATED ARTICLES
- What PTBooth A1 PLUS 2016 Version Delivers
Webcam Settings Tab

Example of settings in Webcam Settings Tab (required if Webcam is used for video recording or as your primary camera to take photos)
REQUIRED SETTINGS (if enabled):
Webcamera Video Settings - specify Webcamera Source, Video Resolution, Video Compressor, Use Webcamera Native Compression (if webcamera has internal hardware compression)
Webcamera Audio Settings - specify Webcamera Microphone Audio Source, Webcamera Microphone Master Volume, Audio Normalization Values: Peak and Gain, Audio Compressor
Compression type - choose what PTBooth will compress: Video only, Audio only, Video and Audio
Format - choose video file format WMV, AVI. Recdommended WMV file format.
OPTIONAL SETTINGS:
Audio/Video Synchronization Adjustment - if required.
Once you set your settings click on "SAVE YOUR SETTINGS" button

Webcam Settings Tab RELATED ARTICLES
- How To Use Webcam To Take Photos in PTBooth A1 PLUS
- How To Set Basic Settings To Record Video in PTBooth A1 PLUS
- How To Set Audio Normalization Values for Video Recording in PTBooth A1 PLUS
Canon Camera Settings Tab

Example of settings in Canon Camera Settings Tab (required if Canon is your primary camera to take photos)
REQUIRED SETTINGS (if enabled):
Camera Settings - specify availabe desired Canon camera settings. NOTE: Available camera settings is different for a particular Canon camera model.
Once you set your settings click on "SET CAMERA SETTINGS" button

Canon Camera Settings Tab RELATED ARTICLES
- Recommended Canon Camera Settings
Maintenance Screens Settings Tab

Example of settings in Maintenance Screens Settings Tab (optional)
REQUIRED SETTINGS (if enabled):
Event START Time - specify your event start time
Event START Time - specify your event end time
OPTIONAL SETTINGS:
Operation Timer - enable Maintenance Screen to automatically START and STOP with the time values specified.
Once you set your settings click on "SAVE YOUR SETTINGS" button

Maintenance Screens Settings Tab RELATED ARTICLES
- How To Use PTBooth Maintenance Screens
- How To Setup and Use Operation Timer
(Time Sensitive Maintenance Screen)
Skin Settings Tab

Example of settings in Skin Settings Tab (required)
REQUIRED SETTINGS:
PTBooth Skin Type - specify your skin type: Square or Wide.
PTBooth Skin Resolution - specify your Skin Resolution. Skin Resolution is a specific size of the Skin files that matches your computer screen resolution.
SUPPORTED SCREEN RESOLUTIONS:
Square: 1024x768, 1280x1024
Wide: 1280x768, 1360x768, 1366x768, 1920x1080
OPTIONAL SETTINGS:
Admin Style - choose your Admin style fro the list. Admin style defines the visual appearance of the PTBooth Admin
Once you set your settings click on "APPLY SELECTED SKIN" button

Skin Settings Tab RELATED ARTICLES
- How To Create Your Own Skin
After you have set all necessary settings in all Required and Optional Tabs your PTBooth A1 PLUS is set and ready to be used.
Back to "How To Articles"
REQUIRED SETTINGS:
Process Steps - enable/disable Step 4 and/or Step 5
Select # of Photos per session - choose how many photos will be taken each session
Event information - specify the Event Date, Event Name, Event Operator
OPTIONAL SETTINGS:
Show # of printouts on the Welcome screen - if enabled you will be able to see total # of prints at a particular moment in the right bottom corner of the Welcome screen.
Show # of photo sessions on the Welcome screen - if enabled you will be able to see total # of photosessions at a particular moment in the right bottom corner of the Welcome screen.
Enable "Choose Number of Print Copies" option for 4x6 - enable/disable choice of how many copies to print for 4x6 layout
Enable "Choose Number of Print Copies" option for 2x6 - enable/disable choice of how many copies to print for 2x6 layout
Countdown - enable/disable manual countdown, specify location of the custom video countdown file
Miscellaneous: Debug Mode - enable/disable Debug Mode - leave blank!
Once you set your settings click on "SAVE YOUR SETTINGS" button

General Settings Tab RELATED ARTICLES
- How To Enable/Disable "Choose the number of copies to print" option in PTBooth A1 PLUS
- How To Use Last 2 Screens (Step 4 and Step 5)
- How To Set up Manual Countdown in PTBooth A1
Printing Settings Tab

Example of settings in Printing Settings Tab (required)
REQUIRED SETTINGS:
Print Template - specify which print template you want to use (choose one of the Default Print Template or Custom built Print Template)
NOTE!!! IF YOU ARE USING PTBooth A1 PRO Version and PTBooth Transfer App
Print Template - you must select Print Template with Transfer ID!
Template preview image will contain "Includes Transfer ID" text

Admin Logo - specify the location on your computer where the logo JPEG file is stored. Admin Logo 1 is required. Admin Logo 2 and Admin image is optional depending on your Print Template layout
Printout Options - choose - Printing Color only, - Printing B&W only, - Printing B&W or Color (guest choice)
# of copies printed - specify the # of copies that will be printed each session
Print Template Position - specify the Print Zoom, Offset Width and Offset Height values
OPTIONAL SETTINGS:
Admin Text - enter desired text if your print template has text element
External Images - if your print template has external image(s) element specify the location on your computer where the each external image file is stored.
Once you set your settings click on "SAVE YOUR SETTINGS" button

Printing Settings Tab RELATED ARTICLES
- How To Use Default Print Templates in PTBooth A1 PLUS
- How To Use Default Print Templates With Background Image in PTBooth A1 PLUS
- How To Achieve Perfect Alignment of Print Template in PTBooth using Print Zoom, Offset Width and Offset Height settings
- How To Setup PTBooth Admin When Transparent/External Images used in Print Template
- How To Reprint Original Photostrips in PTBooth Admin
PDF Printing Settings Tab

Example of settings in PDF Printing Settings Tab (optional)
REQUIRED SETTINGS (if enabled):
PDF Resolution - specify PDF resolution. Recommended 150 dpi. Bigger value delivers more quality but requires more resources and may slowdown your computer
PDF Rendering options - choose PDF Default or PDF with transparent images depending on your needs
OPTIONAL SETTINGS:
Convert PDF to JPEG - enable PDF to JPEG conversion if you wish to have JPEG files instead of PDF.
Once you set your settings click on "SAVE YOUR SETTINGS" button

PDF Printing Settings Tab RELATED ARTICLES
- What PTBooth A1 PLUS 2016 Version Delivers
Webcam Settings Tab

Example of settings in Webcam Settings Tab (required if Webcam is used for video recording or as your primary camera to take photos)
REQUIRED SETTINGS (if enabled):
Webcamera Video Settings - specify Webcamera Source, Video Resolution, Video Compressor, Use Webcamera Native Compression (if webcamera has internal hardware compression)
Webcamera Audio Settings - specify Webcamera Microphone Audio Source, Webcamera Microphone Master Volume, Audio Normalization Values: Peak and Gain, Audio Compressor
Compression type - choose what PTBooth will compress: Video only, Audio only, Video and Audio
Format - choose video file format WMV, AVI. Recdommended WMV file format.
OPTIONAL SETTINGS:
Audio/Video Synchronization Adjustment - if required.
Once you set your settings click on "SAVE YOUR SETTINGS" button

Webcam Settings Tab RELATED ARTICLES
- How To Use Webcam To Take Photos in PTBooth A1 PLUS
- How To Set Basic Settings To Record Video in PTBooth A1 PLUS
- How To Set Audio Normalization Values for Video Recording in PTBooth A1 PLUS
Canon Camera Settings Tab

Example of settings in Canon Camera Settings Tab (required if Canon is your primary camera to take photos)
REQUIRED SETTINGS (if enabled):
Camera Settings - specify availabe desired Canon camera settings. NOTE: Available camera settings is different for a particular Canon camera model.
Once you set your settings click on "SET CAMERA SETTINGS" button

Canon Camera Settings Tab RELATED ARTICLES
- Recommended Canon Camera Settings
Maintenance Screens Settings Tab

Example of settings in Maintenance Screens Settings Tab (optional)
REQUIRED SETTINGS (if enabled):
Event START Time - specify your event start time
Event START Time - specify your event end time
OPTIONAL SETTINGS:
Operation Timer - enable Maintenance Screen to automatically START and STOP with the time values specified.
Once you set your settings click on "SAVE YOUR SETTINGS" button

Maintenance Screens Settings Tab RELATED ARTICLES
- How To Use PTBooth Maintenance Screens
- How To Setup and Use Operation Timer
(Time Sensitive Maintenance Screen)
Skin Settings Tab

Example of settings in Skin Settings Tab (required)
REQUIRED SETTINGS:
PTBooth Skin Type - specify your skin type: Square or Wide.
PTBooth Skin Resolution - specify your Skin Resolution. Skin Resolution is a specific size of the Skin files that matches your computer screen resolution.
SUPPORTED SCREEN RESOLUTIONS:
Square: 1024x768, 1280x1024
Wide: 1280x768, 1360x768, 1366x768, 1920x1080
OPTIONAL SETTINGS:
Admin Style - choose your Admin style fro the list. Admin style defines the visual appearance of the PTBooth Admin
Once you set your settings click on "APPLY SELECTED SKIN" button

Skin Settings Tab RELATED ARTICLES
- How To Create Your Own Skin
After you have set all necessary settings in all Required and Optional Tabs your PTBooth A1 PLUS is set and ready to be used.
Back to "How To Articles"
REQUIRED SETTINGS:
Print Template - specify which print template you want to use (choose one of the Default Print Template or Custom built Print Template)
NOTE!!! IF YOU ARE USING PTBooth A1 PRO Version and PTBooth Transfer App
Print Template - you must select Print Template with Transfer ID!
Template preview image will contain "Includes Transfer ID" text

Admin Logo - specify the location on your computer where the logo JPEG file is stored. Admin Logo 1 is required. Admin Logo 2 and Admin image is optional depending on your Print Template layout
Printout Options - choose - Printing Color only, - Printing B&W only, - Printing B&W or Color (guest choice)
# of copies printed - specify the # of copies that will be printed each session
Print Template Position - specify the Print Zoom, Offset Width and Offset Height values
OPTIONAL SETTINGS:
Admin Text - enter desired text if your print template has text element
External Images - if your print template has external image(s) element specify the location on your computer where the each external image file is stored.
Once you set your settings click on "SAVE YOUR SETTINGS" button


Printing Settings Tab RELATED ARTICLES
- How To Use Default Print Templates in PTBooth A1 PLUS
- How To Use Default Print Templates With Background Image in PTBooth A1 PLUS
- How To Achieve Perfect Alignment of Print Template in PTBooth using Print Zoom, Offset Width and Offset Height settings
- How To Setup PTBooth Admin When Transparent/External Images used in Print Template
- How To Reprint Original Photostrips in PTBooth Admin
PDF Printing Settings Tab

Example of settings in PDF Printing Settings Tab (optional)
REQUIRED SETTINGS (if enabled):
PDF Resolution - specify PDF resolution. Recommended 150 dpi. Bigger value delivers more quality but requires more resources and may slowdown your computer
PDF Rendering options - choose PDF Default or PDF with transparent images depending on your needs
OPTIONAL SETTINGS:
Convert PDF to JPEG - enable PDF to JPEG conversion if you wish to have JPEG files instead of PDF.
Once you set your settings click on "SAVE YOUR SETTINGS" button

PDF Printing Settings Tab RELATED ARTICLES
- What PTBooth A1 PLUS 2016 Version Delivers
Webcam Settings Tab

Example of settings in Webcam Settings Tab (required if Webcam is used for video recording or as your primary camera to take photos)
REQUIRED SETTINGS (if enabled):
Webcamera Video Settings - specify Webcamera Source, Video Resolution, Video Compressor, Use Webcamera Native Compression (if webcamera has internal hardware compression)
Webcamera Audio Settings - specify Webcamera Microphone Audio Source, Webcamera Microphone Master Volume, Audio Normalization Values: Peak and Gain, Audio Compressor
Compression type - choose what PTBooth will compress: Video only, Audio only, Video and Audio
Format - choose video file format WMV, AVI. Recdommended WMV file format.
OPTIONAL SETTINGS:
Audio/Video Synchronization Adjustment - if required.
Once you set your settings click on "SAVE YOUR SETTINGS" button

Webcam Settings Tab RELATED ARTICLES
- How To Use Webcam To Take Photos in PTBooth A1 PLUS
- How To Set Basic Settings To Record Video in PTBooth A1 PLUS
- How To Set Audio Normalization Values for Video Recording in PTBooth A1 PLUS
Canon Camera Settings Tab

Example of settings in Canon Camera Settings Tab (required if Canon is your primary camera to take photos)
REQUIRED SETTINGS (if enabled):
Camera Settings - specify availabe desired Canon camera settings. NOTE: Available camera settings is different for a particular Canon camera model.
Once you set your settings click on "SET CAMERA SETTINGS" button

Canon Camera Settings Tab RELATED ARTICLES
- Recommended Canon Camera Settings
Maintenance Screens Settings Tab

Example of settings in Maintenance Screens Settings Tab (optional)
REQUIRED SETTINGS (if enabled):
Event START Time - specify your event start time
Event START Time - specify your event end time
OPTIONAL SETTINGS:
Operation Timer - enable Maintenance Screen to automatically START and STOP with the time values specified.
Once you set your settings click on "SAVE YOUR SETTINGS" button

Maintenance Screens Settings Tab RELATED ARTICLES
- How To Use PTBooth Maintenance Screens
- How To Setup and Use Operation Timer
(Time Sensitive Maintenance Screen)
Skin Settings Tab

Example of settings in Skin Settings Tab (required)
REQUIRED SETTINGS:
PTBooth Skin Type - specify your skin type: Square or Wide.
PTBooth Skin Resolution - specify your Skin Resolution. Skin Resolution is a specific size of the Skin files that matches your computer screen resolution.
SUPPORTED SCREEN RESOLUTIONS:
Square: 1024x768, 1280x1024
Wide: 1280x768, 1360x768, 1366x768, 1920x1080
OPTIONAL SETTINGS:
Admin Style - choose your Admin style fro the list. Admin style defines the visual appearance of the PTBooth Admin
Once you set your settings click on "APPLY SELECTED SKIN" button

Skin Settings Tab RELATED ARTICLES
- How To Create Your Own Skin
After you have set all necessary settings in all Required and Optional Tabs your PTBooth A1 PLUS is set and ready to be used.
Back to "How To Articles"
REQUIRED SETTINGS (if enabled):
PDF Resolution - specify PDF resolution. Recommended 150 dpi. Bigger value delivers more quality but requires more resources and may slowdown your computer
PDF Rendering options - choose PDF Default or PDF with transparent images depending on your needs
OPTIONAL SETTINGS:
Convert PDF to JPEG - enable PDF to JPEG conversion if you wish to have JPEG files instead of PDF.
Once you set your settings click on "SAVE YOUR SETTINGS" button

PDF Printing Settings Tab RELATED ARTICLES
- What PTBooth A1 PLUS 2016 Version Delivers
Webcam Settings Tab

Example of settings in Webcam Settings Tab (required if Webcam is used for video recording or as your primary camera to take photos)
REQUIRED SETTINGS (if enabled):
Webcamera Video Settings - specify Webcamera Source, Video Resolution, Video Compressor, Use Webcamera Native Compression (if webcamera has internal hardware compression)
Webcamera Audio Settings - specify Webcamera Microphone Audio Source, Webcamera Microphone Master Volume, Audio Normalization Values: Peak and Gain, Audio Compressor
Compression type - choose what PTBooth will compress: Video only, Audio only, Video and Audio
Format - choose video file format WMV, AVI. Recdommended WMV file format.
OPTIONAL SETTINGS:
Audio/Video Synchronization Adjustment - if required.
Once you set your settings click on "SAVE YOUR SETTINGS" button

Webcam Settings Tab RELATED ARTICLES
- How To Use Webcam To Take Photos in PTBooth A1 PLUS
- How To Set Basic Settings To Record Video in PTBooth A1 PLUS
- How To Set Audio Normalization Values for Video Recording in PTBooth A1 PLUS
Canon Camera Settings Tab

Example of settings in Canon Camera Settings Tab (required if Canon is your primary camera to take photos)
REQUIRED SETTINGS (if enabled):
Camera Settings - specify availabe desired Canon camera settings. NOTE: Available camera settings is different for a particular Canon camera model.
Once you set your settings click on "SET CAMERA SETTINGS" button

Canon Camera Settings Tab RELATED ARTICLES
- Recommended Canon Camera Settings
Maintenance Screens Settings Tab

Example of settings in Maintenance Screens Settings Tab (optional)
REQUIRED SETTINGS (if enabled):
Event START Time - specify your event start time
Event START Time - specify your event end time
OPTIONAL SETTINGS:
Operation Timer - enable Maintenance Screen to automatically START and STOP with the time values specified.
Once you set your settings click on "SAVE YOUR SETTINGS" button

Maintenance Screens Settings Tab RELATED ARTICLES
- How To Use PTBooth Maintenance Screens
- How To Setup and Use Operation Timer
(Time Sensitive Maintenance Screen)
Skin Settings Tab

Example of settings in Skin Settings Tab (required)
REQUIRED SETTINGS:
PTBooth Skin Type - specify your skin type: Square or Wide.
PTBooth Skin Resolution - specify your Skin Resolution. Skin Resolution is a specific size of the Skin files that matches your computer screen resolution.
SUPPORTED SCREEN RESOLUTIONS:
Square: 1024x768, 1280x1024
Wide: 1280x768, 1360x768, 1366x768, 1920x1080
OPTIONAL SETTINGS:
Admin Style - choose your Admin style fro the list. Admin style defines the visual appearance of the PTBooth Admin
Once you set your settings click on "APPLY SELECTED SKIN" button

Skin Settings Tab RELATED ARTICLES
- How To Create Your Own Skin
After you have set all necessary settings in all Required and Optional Tabs your PTBooth A1 PLUS is set and ready to be used.
Back to "How To Articles"
REQUIRED SETTINGS (if enabled):
Webcamera Video Settings - specify Webcamera Source, Video Resolution, Video Compressor, Use Webcamera Native Compression (if webcamera has internal hardware compression)
Webcamera Audio Settings - specify Webcamera Microphone Audio Source, Webcamera Microphone Master Volume, Audio Normalization Values: Peak and Gain, Audio Compressor
Compression type - choose what PTBooth will compress: Video only, Audio only, Video and Audio
Format - choose video file format WMV, AVI. Recdommended WMV file format.
OPTIONAL SETTINGS:
Audio/Video Synchronization Adjustment - if required.
Once you set your settings click on "SAVE YOUR SETTINGS" button

Webcam Settings Tab RELATED ARTICLES
- How To Use Webcam To Take Photos in PTBooth A1 PLUS
- How To Set Basic Settings To Record Video in PTBooth A1 PLUS
- How To Set Audio Normalization Values for Video Recording in PTBooth A1 PLUS
Canon Camera Settings Tab

Example of settings in Canon Camera Settings Tab (required if Canon is your primary camera to take photos)
REQUIRED SETTINGS (if enabled):
Camera Settings - specify availabe desired Canon camera settings. NOTE: Available camera settings is different for a particular Canon camera model.
Once you set your settings click on "SET CAMERA SETTINGS" button

Canon Camera Settings Tab RELATED ARTICLES
- Recommended Canon Camera Settings
Maintenance Screens Settings Tab

Example of settings in Maintenance Screens Settings Tab (optional)
REQUIRED SETTINGS (if enabled):
Event START Time - specify your event start time
Event START Time - specify your event end time
OPTIONAL SETTINGS:
Operation Timer - enable Maintenance Screen to automatically START and STOP with the time values specified.
Once you set your settings click on "SAVE YOUR SETTINGS" button

Maintenance Screens Settings Tab RELATED ARTICLES
- How To Use PTBooth Maintenance Screens
- How To Setup and Use Operation Timer
(Time Sensitive Maintenance Screen)
Skin Settings Tab

Example of settings in Skin Settings Tab (required)
REQUIRED SETTINGS:
PTBooth Skin Type - specify your skin type: Square or Wide.
PTBooth Skin Resolution - specify your Skin Resolution. Skin Resolution is a specific size of the Skin files that matches your computer screen resolution.
SUPPORTED SCREEN RESOLUTIONS:
Square: 1024x768, 1280x1024
Wide: 1280x768, 1360x768, 1366x768, 1920x1080
OPTIONAL SETTINGS:
Admin Style - choose your Admin style fro the list. Admin style defines the visual appearance of the PTBooth Admin
Once you set your settings click on "APPLY SELECTED SKIN" button

Skin Settings Tab RELATED ARTICLES
- How To Create Your Own Skin
After you have set all necessary settings in all Required and Optional Tabs your PTBooth A1 PLUS is set and ready to be used.
Back to "How To Articles"
REQUIRED SETTINGS (if enabled):
Camera Settings - specify availabe desired Canon camera settings. NOTE: Available camera settings is different for a particular Canon camera model.
Once you set your settings click on "SET CAMERA SETTINGS" button

Canon Camera Settings Tab RELATED ARTICLES
- Recommended Canon Camera Settings
Maintenance Screens Settings Tab

Example of settings in Maintenance Screens Settings Tab (optional)
REQUIRED SETTINGS (if enabled):
Event START Time - specify your event start time
Event START Time - specify your event end time
OPTIONAL SETTINGS:
Operation Timer - enable Maintenance Screen to automatically START and STOP with the time values specified.
Once you set your settings click on "SAVE YOUR SETTINGS" button

Maintenance Screens Settings Tab RELATED ARTICLES
- How To Use PTBooth Maintenance Screens
- How To Setup and Use Operation Timer
(Time Sensitive Maintenance Screen)
Skin Settings Tab

Example of settings in Skin Settings Tab (required)
REQUIRED SETTINGS:
PTBooth Skin Type - specify your skin type: Square or Wide.
PTBooth Skin Resolution - specify your Skin Resolution. Skin Resolution is a specific size of the Skin files that matches your computer screen resolution.
SUPPORTED SCREEN RESOLUTIONS:
Square: 1024x768, 1280x1024
Wide: 1280x768, 1360x768, 1366x768, 1920x1080
OPTIONAL SETTINGS:
Admin Style - choose your Admin style fro the list. Admin style defines the visual appearance of the PTBooth Admin
Once you set your settings click on "APPLY SELECTED SKIN" button

Skin Settings Tab RELATED ARTICLES
- How To Create Your Own Skin
After you have set all necessary settings in all Required and Optional Tabs your PTBooth A1 PLUS is set and ready to be used.
Back to "How To Articles"
REQUIRED SETTINGS (if enabled):
Event START Time - specify your event start time
Event START Time - specify your event end time
OPTIONAL SETTINGS:
Operation Timer - enable Maintenance Screen to automatically START and STOP with the time values specified.
Once you set your settings click on "SAVE YOUR SETTINGS" button

Maintenance Screens Settings Tab RELATED ARTICLES
- How To Use PTBooth Maintenance Screens
- How To Setup and Use Operation Timer
(Time Sensitive Maintenance Screen)
Skin Settings Tab

Example of settings in Skin Settings Tab (required)
REQUIRED SETTINGS:
PTBooth Skin Type - specify your skin type: Square or Wide.
PTBooth Skin Resolution - specify your Skin Resolution. Skin Resolution is a specific size of the Skin files that matches your computer screen resolution.
SUPPORTED SCREEN RESOLUTIONS:
Square: 1024x768, 1280x1024
Wide: 1280x768, 1360x768, 1366x768, 1920x1080
OPTIONAL SETTINGS:
Admin Style - choose your Admin style fro the list. Admin style defines the visual appearance of the PTBooth Admin
Once you set your settings click on "APPLY SELECTED SKIN" button

Skin Settings Tab RELATED ARTICLES
- How To Create Your Own Skin
After you have set all necessary settings in all Required and Optional Tabs your PTBooth A1 PLUS is set and ready to be used.
Back to "How To Articles"
REQUIRED SETTINGS:
PTBooth Skin Type - specify your skin type: Square or Wide.
PTBooth Skin Resolution - specify your Skin Resolution. Skin Resolution is a specific size of the Skin files that matches your computer screen resolution.
SUPPORTED SCREEN RESOLUTIONS:
Square: 1024x768, 1280x1024
Wide: 1280x768, 1360x768, 1366x768, 1920x1080
OPTIONAL SETTINGS:
Admin Style - choose your Admin style fro the list. Admin style defines the visual appearance of the PTBooth Admin
Once you set your settings click on "APPLY SELECTED SKIN" button

